· Car Removals Whangarei
Front Bumper of a Car Functions Materials and Repair Guide

You're standing at the front of the car, looking at a cracked corner, a loose panel, or a scuff that seemed minor when it happened. Maybe it was a parking nudge outside the supermarket. Maybe you're buying a used car and wondering whether the front bumper is just painted plastic.
That question matters more than most drivers realise.
On a modern vehicle, the front bumper of a car is part skin, part cushion, part structure. It shapes the look of the nose, helps manage low-speed knocks, and works with the rest of the front end when a crash is serious enough to involve the crumple zone, the safety cage, and airbags. What you can see from outside is only one layer of the story.
That's why a small crack can be cheap to sort out on one vehicle and the start of a much bigger decision on another. In Northland especially, the cost isn't only the panel work. It can include towing, time off the road, paint matching, parts delays, and the question many guides skip entirely: is this still worth repairing, or is it time to remove the vehicle?
Table of Contents
- Introduction to What Your Front Bumper Really Does
- How the Front Bumper System Works Together
- Common Materials and Construction Behind the Cover
- Why NZ Frontal Impact Rules Shape Your Bumper
- How to Assess Front Bumper Damage Safely
- Repair or Replace and What It Really Costs in NZ
- Staying Safe Legal and Responsible After Bumper Damage
Introduction to What Your Front Bumper Really Does
A low-speed bump often feels harmless. You hear a thud, step out, and see a scrape or a split near the grille. The first thought is often about appearance. Will it polish out? Can it be glued? Will it pass a WOF?
Those are fair questions, but they come second.
The first question is what the bumper was doing at the moment of impact. A front bumper isn't there only to make the car look finished. It's there to take the first hit, manage some of that energy, and pass the rest into parts of the car designed to cope with it.
The bumper isn't one piece
When drivers say “bumper”, they usually mean the painted outer cover. That's the visible shell. Behind it, many vehicles have an absorber, a reinforcement beam, and mounting points that connect into the front crash structure.
If the outer skin is like a jacket, the hidden parts are the padding and bones underneath.
A bumper can look minor from the driveway and still hide damage behind the cover.
That's where people get caught out with used cars. A neat repaint can make the front end look tidy, but it doesn't tell you whether the bumper sits square, whether the brackets are straight, or whether the structure behind it still behaves as intended.
Why this matters in New Zealand
In New Zealand, front-end protection isn't just a styling issue. The rules around frontal impact protection changed the way modern vehicles entering the fleet had to be built and certified. That means the front bumper on many vehicles is part of a larger, date-linked crash system, not a bolt-on trim piece.
For owners, that changes the decision after damage. You're not only asking, “Can this be fixed?” You're also asking:
- Is it cosmetic only, or has the impact affected the crash structure?
- Will a repair preserve proper energy absorption, or just make it look straight?
- Has the damage reached the point where the vehicle no longer makes financial sense to keep?
Those are the practical questions that matter when you're standing beside the car in Whangarei, Kaitaia, Dargaville, or a rural yard outside town.
How the Front Bumper System Works Together
Think of the front bumper system like a bike helmet. The smooth outer shell gives shape and helps things slide across the surface. The padding underneath absorbs force. The structure below that spreads the load so one small hit doesn't punch straight through.
Cars use the same layered logic.
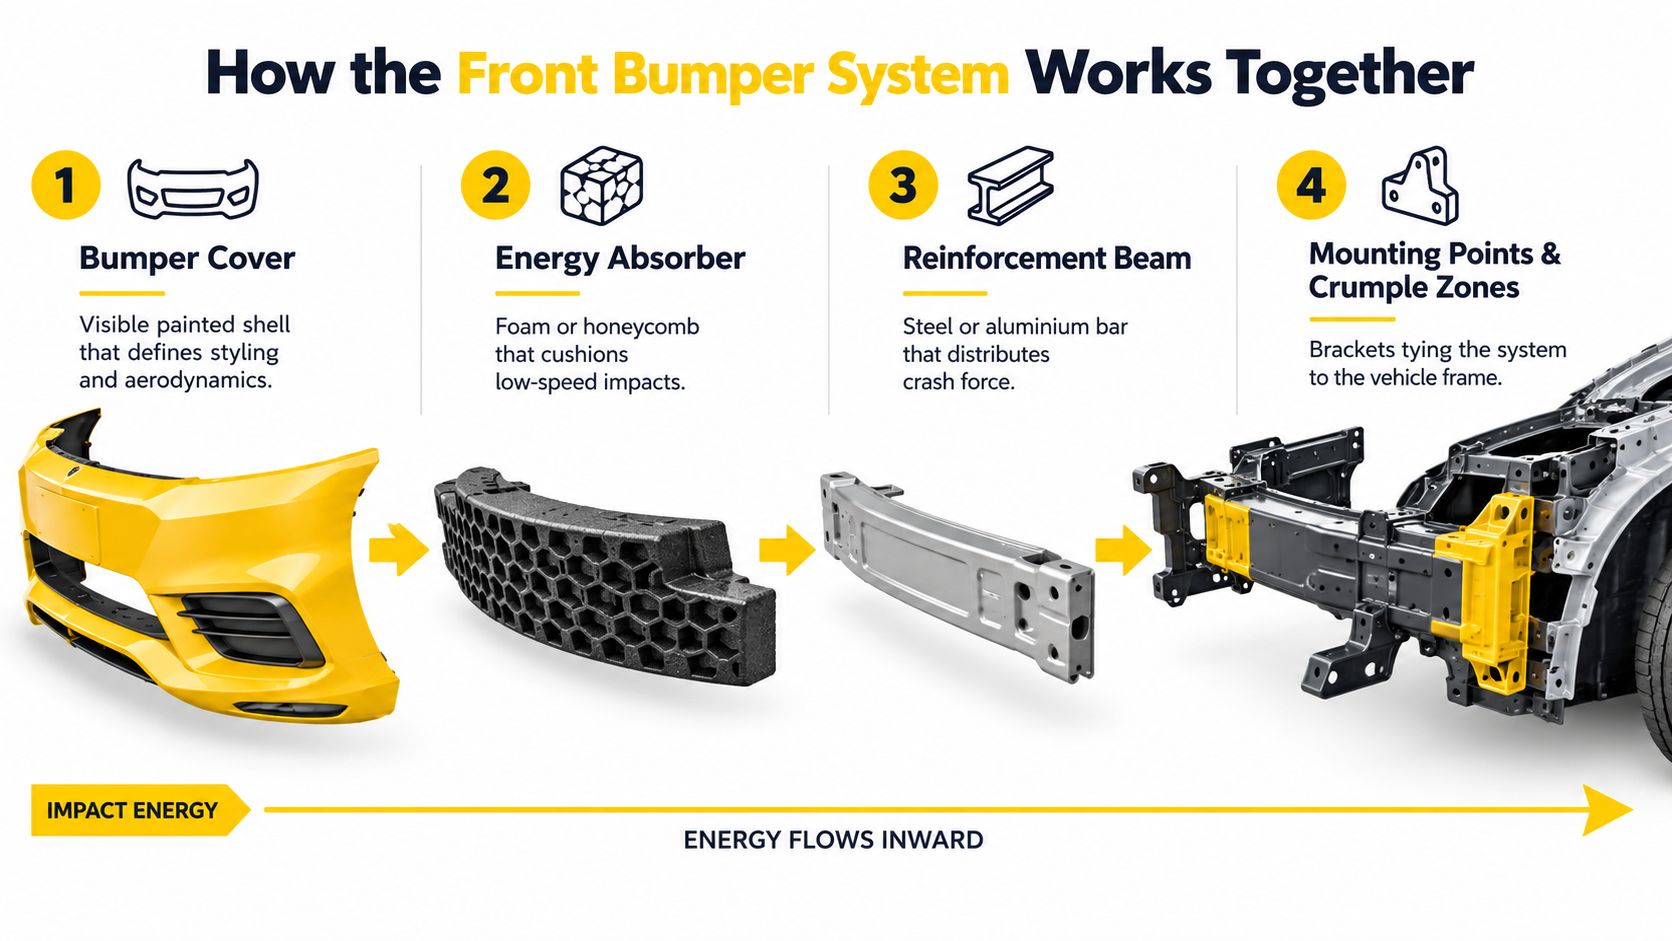
Layer one and two
Start with the bumper cover. This is the painted outer skin you see every day. It gives the car its shape around the nose, grille, lights, and lower air openings. It also has to work around parking sensors, fog lights, cameras, trim pieces, and airflow.
Behind that sits the energy absorber. On many vehicles this is foam or a honeycomb-style insert. Its job is to cushion lower-speed impacts and reduce the force passed further in.
A shopping trolley strike may scuff only the cover. A firmer knock may crush the absorber even if the outside doesn't look dramatic.
Layer three and four
Further in, there's usually a reinforcement beam. This is commonly a metal bar that helps spread crash force across a wider area. Instead of one small point taking everything, the load gets distributed.
Then come the mounting points and the front crash structure. These tie the bumper system into the body and front crumple zones. Once force reaches this area, the car starts relying on its broader crash design, not just the bumper itself.
Why cracks can mislead you
A cracked outer cover doesn't always mean major structural damage. But the opposite is also true. A cover can spring back enough to look almost fine while clips, absorbers, or brackets behind it have shifted.
Check for clues like these:
- Uneven panel gaps where the bumper meets the guards or headlights
- A corner that won't sit flush after being pushed back in
- Loose movement by hand that suggests broken retainers
- New rubbing marks underneath from parts no longer sitting where they should
Practical rule: If the bumper has moved, don't judge the job by paint damage alone. Judge it by alignment, security, and what the impact may have changed underneath.
Pedestrian safety shapes the outer form
The front of a car also has to behave reasonably when it contacts a person, not only another vehicle or object. That's one reason many modern bumpers have rounded shapes, controlled clearances, and some softness in the outer layers.
If someone fits a very rigid add-on or leaves hardware protruding near the surface, the bumper may stop behaving the way the original design intended. That matters for safety, legality, and repair quality.
Common Materials and Construction Behind the Cover
The front bumper of a car is built from mixed materials because one material can't do every job well. You need something that looks good and flexes a bit, something that spreads force, and something that absorbs it.
That's why modern bumpers are layered rather than solid.
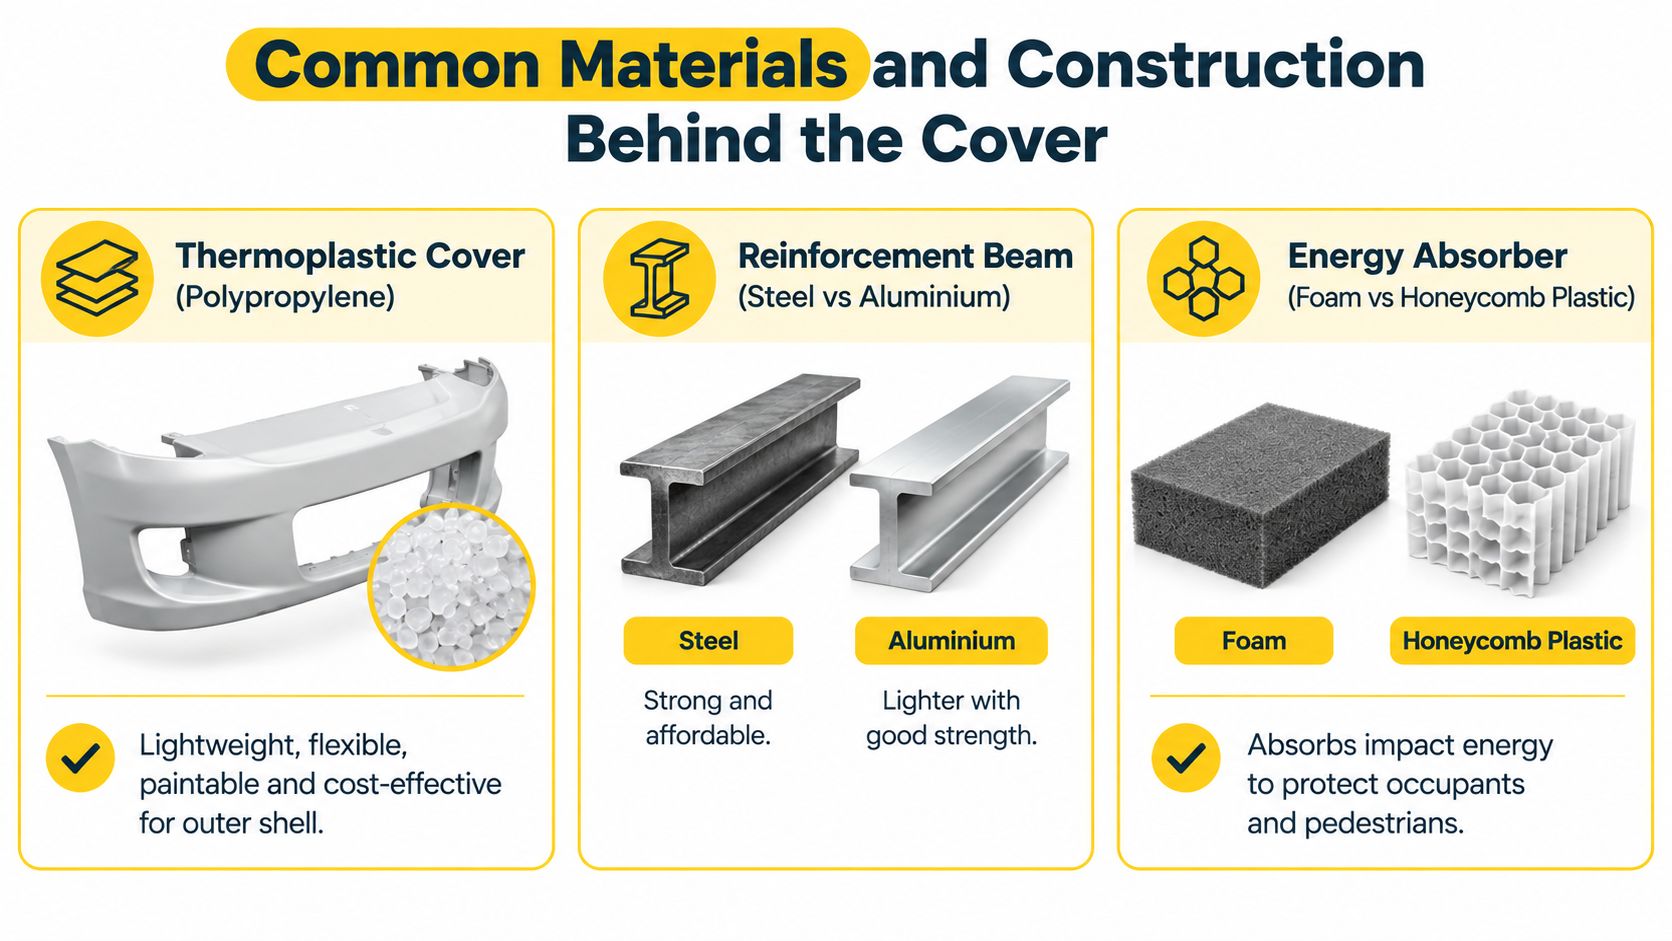
The outer cover
Most late-model passenger vehicles use a thermoplastic cover, often polypropylene-based. Owners usually just call it plastic, but that undersells what it does. It's light, flexible enough to take minor knocks, and it accepts paint well.
That flexibility is useful in daily driving. A light bump might mark the paint without folding the whole panel like thin metal would.
For repairers, thermoplastic covers can sometimes be repaired if the damage is local and the mounting points remain sound. The difficulty rises fast when the plastic tears, creases hard, or loses shape around clips and tabs.
The beam behind it
Behind the cover, many vehicles use a steel or aluminium reinforcement beam.
Steel is commonly chosen where strength and cost matter most. Aluminium helps save weight while still providing strong support. From the outside, you won't know which your car uses unless you inspect the build information or remove parts.
The material changes the repair conversation:
| Material area | Common benefit | Repair implication |
|---|---|---|
| Thermoplastic cover | Flexible and paintable | Good for cosmetic repair if tabs and shape are intact |
| Steel beam | Strong and usually cost-conscious | Surface corrosion matters over time, especially near the coast |
| Aluminium beam | Lighter with good strength | Replacement decisions can differ because shape recovery is limited |
Absorbers and inserts
Between cover and beam, many bumpers include foam or plastic honeycomb absorbers. These don't exist for appearance. Their role is to compress in a controlled way.
If that insert has crushed, a clean-looking repaint on the outside won't restore the original behaviour. You need the whole stack to be right, not just the visible shell.
In coastal Northland, moisture and salt air make hidden hardware worth checking closely. A tidy bumper cover can sit over rusty fasteners, brackets, or previous repair work.
Why material matters when choosing repair or replacement
Material choice affects more than the workshop quote.
It changes how the bumper handles:
- Paint matching, especially where textured and painted sections meet
- Sensor mounting, because parking sensors and cameras need stable alignment
- Long-term durability, especially on vehicles parked near the sea
- Parts sourcing, since some covers are common and others take time to find
Older vehicles and some utes can differ from family hatchbacks and sedans. You may see more exposed metal bars, heavier add-ons, or simpler front-end layouts. Newer family cars usually hide a lot more inside a cleaner outer shell, which is nice until one cracked section affects trim, mounts, sensors, and paint all at once.
Why NZ Frontal Impact Rules Shape Your Bumper
In New Zealand, the front bumper is tied to a bigger legal and safety picture. It isn't treated as a decorative nose panel. For many vehicles, it sits within a certified frontal impact protection system.
The rule changes happened in stages. The Land Transport Rule Frontal Impact 1997 came into force on 1 January 1998, then the replacement Frontal Impact 2001 Rule came into force on 1 April 2002 and required passenger cars first certified for entry into service in New Zealand on or after that date to comply with an approved frontal impact standard, as set out in the New Zealand frontal impact rule text.
The date cut-offs that matter
For light passenger vehicles with a gross vehicle mass of 2,500 kg or less, New Zealand requires compliance with an approved frontal impact occupant protection standard in these key cases, listed in the NZTA inspection guidance on frontal impact structure:
- Class MA vehicles manufactured on or after 1 March 1999
- Class MA vehicles first registered in New Zealand when under 20 years old on or after 1 April 2002
- Class MB and MC vehicles manufactured on or after 1 October 2003
That gives owners a practical shortcut. You often can't tell a compliant front-end system by sight alone, but you can often infer a lot from the car's manufacture date and when it first entered service here.
Why that changes repair decisions
NZTA's position is that frontal-impact compliance supports the front crumple zone, safety cage, and occupant protection features working together in a frontal crash. So when the bumper area is damaged, the question isn't only whether the panel can be made to fit again.
The question is whether the repair preserves the way the front of the vehicle manages energy.
That matters with aftermarket bars, body kits, stiff repairs, and improvised mounting work. NZTA guidance says frontal impact protection systems can't be retrofitted to a vehicle that wasn't designed and certified for them, and bumper-related modifications must not weaken structure, remove required components, or create pedestrian snagging or hooking risks, as outlined in NZTA guidance on crush zones and crumple zones.
Two common points of confusion
People often get stuck on these two ideas:
“If I can bolt it on, it should be fine.”
Not necessarily. A part can physically fit and still change how the front end deforms.“Can't I just add better crash protection later?”
Not in the way many people imagine. NZTA states that these protection systems can't be added afterward to a vehicle not designed and certified for them.
For everyday owners, the takeaway is simple. Treat front bumper repairs as safety work with paint on top, not paint work with safety somewhere in the background.
How to Assess Front Bumper Damage Safely
After a bump, you don't need to strip the car down to make a useful first assessment. You do need to slow down and look in the right order.
Start with the simple checks while the vehicle is parked on level ground, engine off, and safe to walk around. If there's fluid leaking, rubbing on the tyre, or anything hanging low, stop there and organise help.
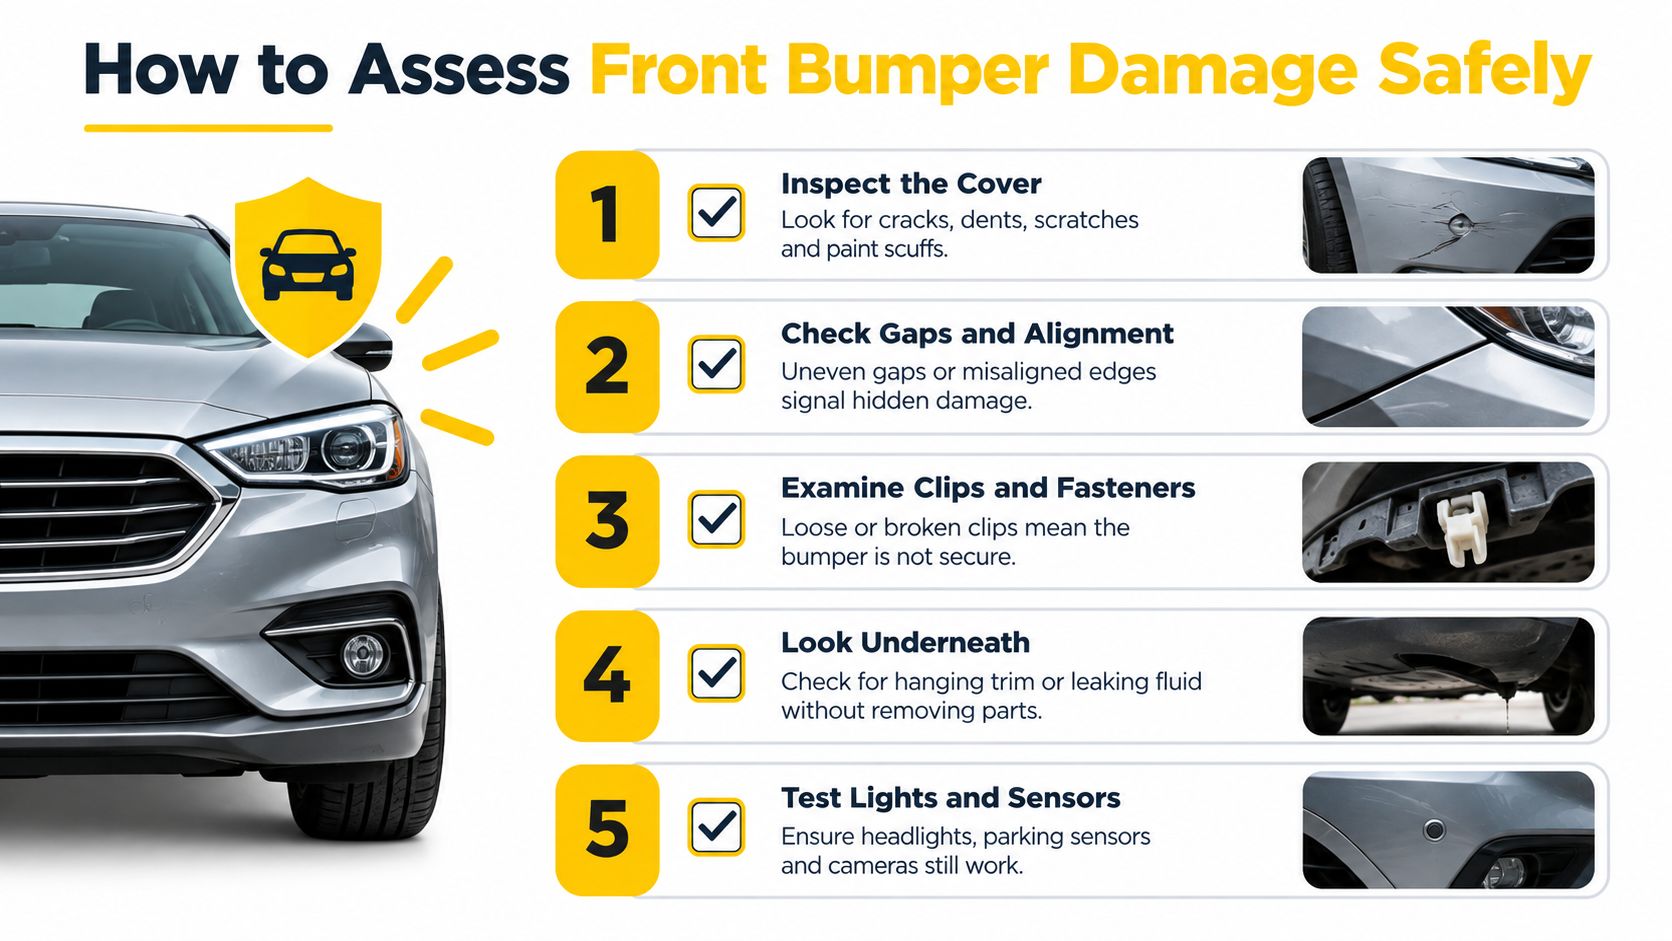
A safe driveway check
Use this order because each step tells you whether it's worth looking closer.
Look at the cover first.
Scuffs and light scratches can be cosmetic. Splits, punctures, and sharp folds usually mean a more involved repair.Step back and compare both sides.
Are the gaps even where the bumper meets the guards and headlights? One side tucked in and the other side proud often points to broken mounts or shifted brackets.Press lightly near the corners.
A secure bumper should feel attached, not floppy. Don't force anything back into place if it resists.Check below without removing parts.
Use a torch if needed. Look for loose splash trays, hanging trim, or fresh scrape marks.Test what the bumper area carries.
Headlights, fog lights, parking sensors, and cameras should still behave normally.
What damage tends to mean
A supermarket trolley tap usually stays at the surface. You may get paint transfer or a shallow mark.
A low-speed intersection knock is different. Even if the car is still drivable, the load can shift clips, crush an absorber, or bend the beam behind the cover.
These clues deserve extra caution:
- One headlight suddenly sits out of line
- The bonnet gap changes after the hit
- A sensor fault appears
- The bumper rubs the tyre liner on turns
- You hear rattling from the nose after driving off
If the bumper no longer sits naturally, don't assume a clip has simply popped out. Something behind it may have changed position.
When to stop driving
If the bumper is loose, dragging, interfering with lights, or sitting near a wheel, don't keep using the car casually. At that point, you may need a tow rather than a hopeful drive to the workshop. If you're weighing that option in Northland, this guide to arranging a tow truck in Whangarei helps explain when towing is the safer call.
Take photos like a repairer would want them
Take clear photos from:
- Straight on from the front
- Each front corner
- Close-up of cracks or splits
- The gap to each headlight
- Any trim or undertray hanging below
That record helps whether you're speaking to a panel beater, an insurer, or deciding the car's future yourself.
Repair or Replace and What It Really Costs in NZ
Bumper damage stops being a workshop annoyance and becomes a money decision.
In New Zealand, front-end damage can escalate fast. A State/IAG crash-test report covered repair estimates ranging from $3,200 to $13,200 across vehicles tested, equal to roughly 10% to 64% of the price of the new cars involved, according to NZ Herald reporting on those crash-test repair estimates.
That same reporting included a Toyota Corolla with an estimated $1,210 in frontal damage, a Honda Civic reaching $13,202 overall with $9,627 attributed to the front end alone, a Subaru Impreza recording $10,109 in frontal damage, and a Suzuki Swift with a total estimated repair bill of $10,939 against a $16,990 purchase price.
Why bumper jobs jump in price
People often budget for plastic and paint. The invoice often grows because the job also includes hidden items such as brackets, absorber pieces, sensor calibration, grille trim, liners, and labour to strip and refit.
An underserved but useful NZ framing is that many bumper jobs start in the $500 to $2,500+ repair range, while frontal repairs on common NZ cars have been measured from about $1,200 to $10,000, as discussed in this New Zealand panel beating cost guide for 2026 projections. In Northland, towing distance, downtime, and parts supply can push the practical cost even further.
Repair vs replace decision matrix
| Damage Scenario | Best Option | Cost and Time Signals |
|---|---|---|
| Light scuff, no cracks, no alignment change | Repair | Usually worth fixing if paint work is local and mounts are intact |
| Cracked cover, tabs still sound, no hidden movement obvious | Repair or replace | Compare plastic repair quality against price and wait time for a new or used cover |
| Broken mounts, bad panel gaps, sensor issues | Replace and inspect behind | Hidden damage likely. Labour and parts stack up quickly |
| Beam or absorber damage suspected | Structural inspection first | Don't approve cosmetic-only work until the front stack is checked |
| Older car with high kilometres and multiple front-end costs | Removal may make more sense | If towing, parts delays, and total bill approach vehicle value, reassess before spending |
Questions worth asking before you approve the job
Ask the repairer:
- What's damaged behind the cover, if anything?
- Are the clips, brackets, and absorber reusable?
- Will sensors or cameras need recalibration?
- Is a used genuine part available, or only new aftermarket?
- How long will paint, parts, and booking keep the car off the road?
If the car is insured, it also helps to understand how its pre-damage value sits against the likely repair path. This article on car valuation for insurance in New Zealand is useful when you're judging whether a bumper repair is sensible or whether the vehicle is drifting toward economic write-off territory.
One practical option in Northland, when the numbers no longer stack up, is to get a factual removal quote from a licensed dismantler such as Car Removals Whangarei and compare that outcome with the repair path before spending further.
Staying Safe Legal and Responsible After Bumper Damage
The final decision after bumper damage isn't just mechanical. It's legal, safety-related, and environmental too.
A repaired front end still needs to behave properly. NZTA states that an A-frame must not adversely affect frontal impact protection features such as airbags or crumple zones, and for vehicles required to comply with frontal impact standards, the brackets left on the vehicle must sit at least 20 mm behind the forward surface of the bumper so the bumper can deform slightly in a pedestrian impact without contacting the brackets, as noted in the relevant New Zealand rulebook reference covering that 20 mm requirement.
That detail tells you something bigger. Clearance matters. Deformation matters. A bumper that looks tidy but has hidden rigid hardware too close to the face isn't doing the same job anymore.

The disposal question many owners miss
If the bumper is smashed beyond sensible repair, it still has to go somewhere. That's becoming a bigger issue in New Zealand. The Motor Trade Association says over 100,000 bumpers end up in landfill every year, and its plastic2eco programme began in 2025 with a staged North Island rollout through 2026, aiming to divert bumpers into recycling and repurposing streams, according to the MTA announcement on ending bumper waste.
For owners in Northland, that means the end-of-life question is no longer just “who'll take the car?” It's also whether the damaged bumper and the rest of the vehicle can move through a compliant dismantling and recycling process rather than becoming another awkward disposal problem.
A practical next move
If your bumper damage is minor, get a proper repair assessment and make sure the work preserves alignment, energy absorption, and attached systems.
If the job keeps expanding, shift the question from repair price to total ownership cost. Include towing, delay, WOF issues, and what happens if more hidden damage appears once the cover comes off. When the vehicle no longer makes sense to keep, a structured option like scrap car removal in Northland can be the cleaner path.
Keep every photo, quote, and ownership detail together before the car moves. Good paperwork makes insurance, sale, or disposal much easier.
If your front bumper damage has pushed the car past practical repair, Car Removals Whangarei can buy damaged, non-running, and insurance write-off vehicles in Northland, arrange pickup, and complete NZTA ownership notification at collection. That's useful when a bumper impact has turned into a bigger front-end problem and you need a clear exit rather than another round of repair quotes. See Car Removals Whangarei for a quote and pickup options.
- front bumper of a car
- car bumper repair
- bumper replacement cost
- car body parts
- vehicle safety NZ